2009-04-23

Shrink LV (Logical Volume ) default Installation group of Fedora/ Red Hat linux

Hi, friends, as I mention on my earlier post that today Linux is also going to popular OS. So the Computer vender generally ships preloaded OS like Vista, LINUX etc to the laptop or Desktop,  and only give a single partition for work on which already system files are Installed  with it they generally hide one partition called recovery Installation . If you get any problem get attacked by virus then with a single button you get back to  your previous stat at which you purchased your PC. But what about your precious data , well it is lost.
If you get Windows as a Preloaded OS then you are very Lucky because you get many stuff or software related to create /resize partition (on internet some are free) , which can make a room ( resize your existing partition and make new partition) to save your data. And by chance you get Linux like Fedora red hat SUSE etc  then you definitely suffer more  for that I already mention what to do,  for detail see my previous Resizing the Preloaded Operating system

Now come to the point If you try to resize the LV partition (Logical Volume) on generally fedora/ red hat  then you has to do some extra command line steps. Don’t worry these are easy as GUI, but you have to do some labor.
 follow these steps for easy configuration:-- 
  • Boot Fedora Installation CD/DVD  at rescue mode
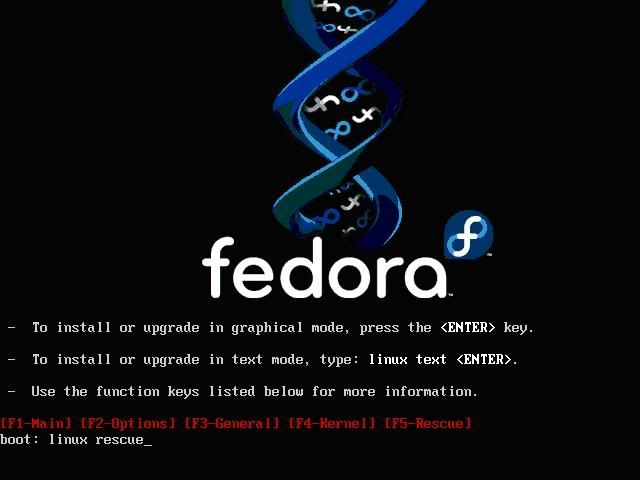


It take some time to go to rescue mode after boot , select keyboard layout and language,  After that it ask you to choose the “NETWORK SETUP” so just skip it because there is no need to setup Network
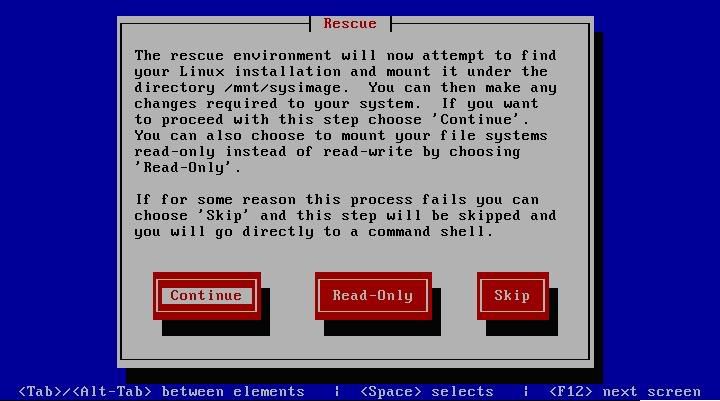
New  screen appear, which Inform you that  “ The rescue environment will now attempt to find your Linux installation and mount it under the directory  /mnt/sysimage” . Click “CONTINUE ”  


  • If everything is Ok , then you get the screen like this 
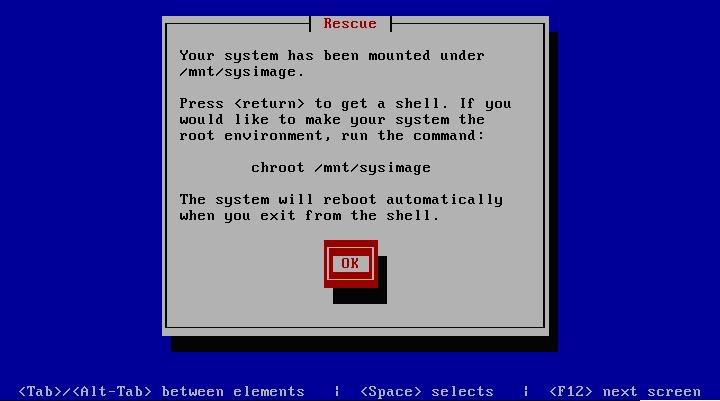


after clicking on “ok” you get Bash shell
Now type the “mount” command to see the file system mounted on mnt/sysimage, also use df –h to see the disk usage , write down the results because you really need that when you take next steps like volume used etc
         #mount
         #df –h


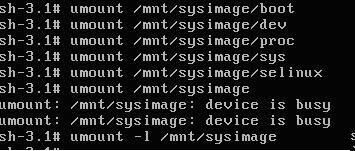
/dev/VolGroup00/LogVol00 is the LV group partition which you have to shrink so write down its size used space etc.Unmount everything under /mnt/sysimage and finally /mnt/sysimage itself. Use the "-l" option for umount if you get complaints about busy devices.
#umount /mnt/sysimage/boot
#umaunt /mnt/sysimage/dev
#umount /mnt/sysimage/proc etc


Now execute command “e2fsck –f” (e2fsck is used to check a Linux
second extended file system (ext2fs))and “resize2fs” with the size till
you want your new LV
#e2fsck –f /dev/VolGroup00/LogVol00
#resize2fs /dev/VolGroup00/LogVol00 3G

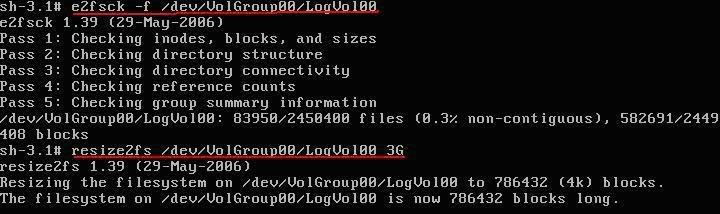
Remember one thing LVM allocates space in 32MB chunks by default, the new size must be a multiple of the LVM extent size. Leave 20% free space on the volume so that all the files work well. Don’t shrink full file system.
Now type “lvm” and then execute the command “lvresize”
    Lvm>lvresize –-size 3G /dev/VolGroup00/LogVol00
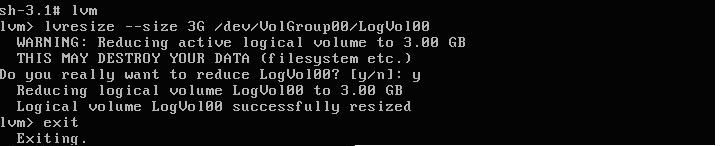
3G means you want to shrink the partition till it becom 3G, you can use your own value like 20G , 10G as you want.
Now write "exit" and then again "exit". Here you done half of your work. At the LV group you created a free space. If you want only till that step then you leave it here, but if you want to make free space outside the LV group to install other OS then continue.
After writing “exit” at Bash shell system restart, so you have to  boot it into rescue modea gain  as mention above but now skip the step when it says it want to attempt to mount the system in mnt/sysimage directory.
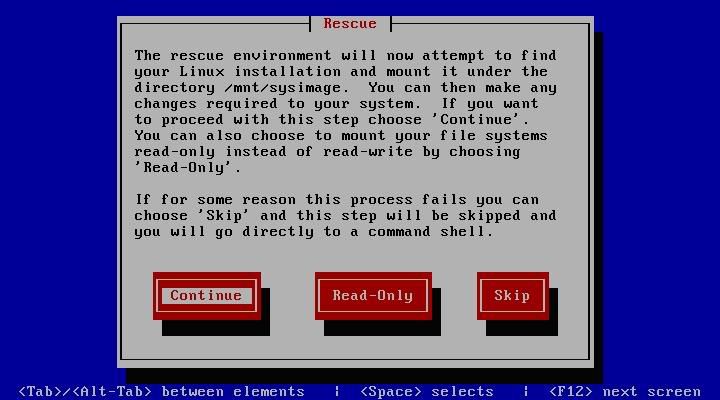
 

Now you get Bash shell again, activate the LVM by the command “lvm vgchange –a y”
              #lvm vgchange –a y
    • and execute command fsck –fc on /dev/VolGroup00/LogVol00 to update /etc/fstab directory.
             #fsck –fc /dev/VolGroup00/LogVol00
    • If you have knowledge of Linux then there is a swap file system which is created after VolGroup00/LogVol00 that is VolGroup00/LogVol01 , so to make new room you have to first remove it and then again make it after the new LV. Don’t worry you just temporarily removing it
    • Execute command “lvm lvs”  
              #lvm lvs         It shows you the exect size of your swap file say it is 1.59G
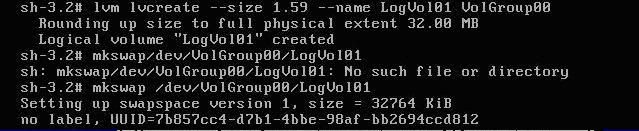
             Execute command “lvm lvremove” , “lvm lvcreate” on /dev/VolGroup00/LogVol01
             #lvm lvremove /dev/VolGroup00/LogVol01
             #lvm lvcreat ---size 1.59G –name LogVol01 VolGroup00
             #mkswap /dev/VolGroup00/LogVol01


    Now Check how much you can shrink it by executing the command “lvm pvs”
             #lvm pvs
    Write down the result
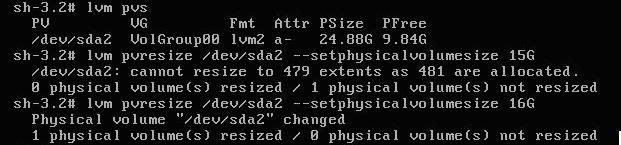


    Now you can resize your /dev/sda2 physical volume to final size in between anything 10G to anything between 24.88G .
    Execute command “lvm pvresize”
              #lvm pvresize /dev/sda2 --setphysicalvolumesize 16G
    If command fails then that means your shrinking size is too small because there are still allocated extents other then swap, move it like this.
    Execute command “lvm pvs units s” ‘s’ for sectors it will display the partition size in sectors take note of PSIZE and execute parted to display the partion size in sectors (starting and ending ) and make note of that
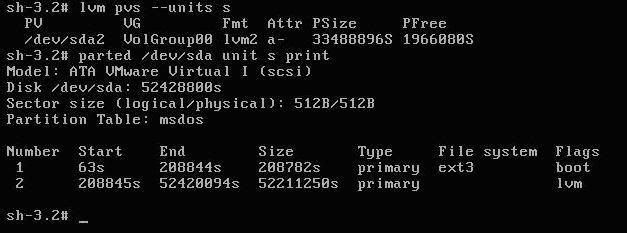
    Now here you already free the space within LV group, and shrink the boundry of the lv group, so you have just take start sector of LVM and reduce the end sector to shrink it but make safty mark after 64MB (131072 sectors) .
    • Execute command “parted”
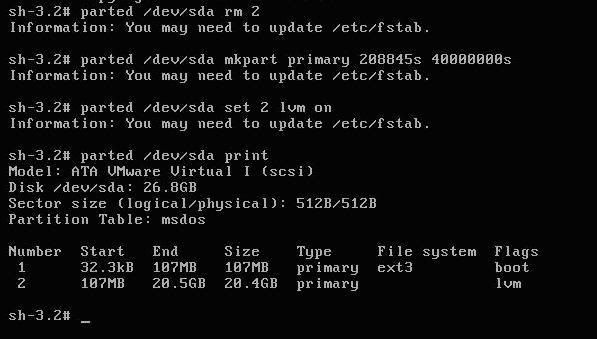
              #parted /dev/sda rm 2 (2 is s/no of partition)  
    • And recreat the partition like this 
             #parted /dev/sda mkpart primary 208845s 40000000s
             #parted /dev/sda set 2 lvm on
             #parted /dev/sda print


    Then execute the commands “fdisk –l /dev/sda” and finally fsck –fc to update /etc/fstab
             #fdisk –l /dev/sda
             #fsck –fc /dev/VolGroup00/LogVol00
    Now you got space as you desire, It’s a example you can put your own values to make your desire partition space .

    I get reference  from these two posts so read these posts if  at any point you not understand

    How to shrink a default install LVM PV to create another partition 

    How to shrink your LVM root volume using rescue mode 

    2009-03-28

    Conficker.C Virus Truth or Rumor Spreading from 1 April

     
    A new virus Conficker.C also named as Downadup, will Start spreading from 1April. Well Who knows it’s a rumor or a True news but if it is Exactly a News then it will be very pain full experience of this year, for corporate sector. Expert says it is much more dangerous, then its other two forms ( Conficker.A and Conficker.B ), Its main target is Security Center of your System, its alone capable in blocking security update sites.


    When it execute it will make its multiple copies to system folder in form of small dll files , which will randomly and independently execute itself, some time it drop a copy in Program Files, Documents and settings folders also. It will start automatically in startup, register itself as a service and start blocking to access the security sites, it block some services like Automatic Update (wuauserv), Background Intelligent Service(BITS), Windows Security Center(wscsvc), and Antivirus/Security services, so that it will do its work properly.


    When it blocks all Security related websites, services then it start connecting with other threat, and malware websites and download updates from the sites, means it will invite more, virus, Worms, spyware to come on to your system and then also send information of your system, sperms mails from your system to other or on your system too. If in case you try to restore your system to back date then you unable to do so because it will already deleted all system restore points in your system after execute.


    How you find that your system is infected with this virus?

    Well no one know how it infect the system but check these to find is really your system is infected or not .


    1. Check the services are disable itself :


    • wscsvc - Security Center


    • WinDefend Windows Defender ( In windows Xp and available already in Vista)


    • wuauserv - Automatic Updates


    • BITS - Background Intelligent Transfer Service


    • ERSvc - Error Reporting Service


    • WerSvc - Windows Error Reporting Service (available in Vista)

    2. Check system restore point is created daily on your system or not


    •  Click START--- RUN--- and type without quota “msconfig” and then click on LAUNCH SYTEM RESTORE --- and then RESTORE MY COMPUTER TO EARLIER POINT and click NEXT and see at right side is it showing you restore point or not .


    • You also reach at Restore settings through START--- ALL PROGRAMS --- ACCESSORIES--- SYSTEM TOOLS --- SYSTEM RESTORE


    • Or try START—RUN and type “rstrui.exe” without quota.

    1. Check the registry value available if not then your system is infected.
    HKLM\Software\Microsoft\Windows\CurrentVersion\explorer\ShellServiceObjects\{FD6905CE-952F-41F1-9A6F-135D9C6622CC}

    1. Check Your antivirus software is updating automatically or not and check all the services of your antivirus is on and working or not.
    If you found any of the issue that means your system is infected with the Conficker.C worm.


    How to stop it to spread and make less impact of Conficker.C virus ?

    To stops the impacts of the virus to spread just follow some steps:

    1. First of all if it is connected with Network, Internet, Domain then disconnect it.
    2. Try to install Some updated and newer version of antivirus software and then full scan your system .
    3. Scan USB drive before backup data and transferring date because it start automatically after just insert in system
    4. Try to start the disable services (RUN--- START--- type “services.exe” ) mention already.
    5. If you suicide then update your system with MS08-067 patch and critical updates by manually download them.
    6. If you not suicide then first format whole computer and scan it with Antivirus software(try to scan with bootable antivirus software cd then apply MS08-067 patch.
    7. Install latest antivirus software and Change the weak system password with stronger and encrypted password which is harder to crack.
    8. It will try to contact one or more of the following domains in order to download further (and, presumably, malicious) updates –
    btddc.com, d34ft.com, 23drf.com, cscs7.com, mgaazz.com, hhgg3.com, trafficconverter.biz so make them block completely

    Check the system periodically . to ensure it will not infected again.

    For further reading see the posting ::::::


    post 1, Post:2 Post 3 Post 4

    2009-03-14

    Resizing Preloaded Operating System

    Laptops are more common machine these days, people spent huge amount to buy their desire dream machine. But most of the company sale their product with preloaded Operating System (Windows XP, Windows Vista, SUSE, Ubantu etc) and consume almost all the hard disk space on it, with no extra drive for the backup of their important data on his/her machine. That means if your OS corrupt everything on it will lost (your documents, files, images, video etc). They provide recovery drive, but that will only provide your operating system back not your whole data. One more problem I want to highlight, if you have Windows Vista or any Linux Version installed in your laptop then you are not able to install Windows over Linux and Windows XP on Windows Vista and not even duel boot them together then what to do to solve it.


    Well every problem has a solution but to do it you have to search for it, but some time you have to pay for that, don't be surprise I am not saying to pay me, I am just saying those tools require money.. here I will explain how to RESIZE THE PRELOADED OPERATING SYSTEM DRIVE with Gnome Partition Editor(gparted) its a freeware tool, so don't worry for its payment.


    To use it follow the steps:-

    1. Download the GParted (Genome Partition Editor) Live cd.


    2. Then Burn it with Nero or any ISO burner software on a blank disk.
    3. Boot the GParted CD
    4.
    5.Select the basic settings like keyboard, language etc.


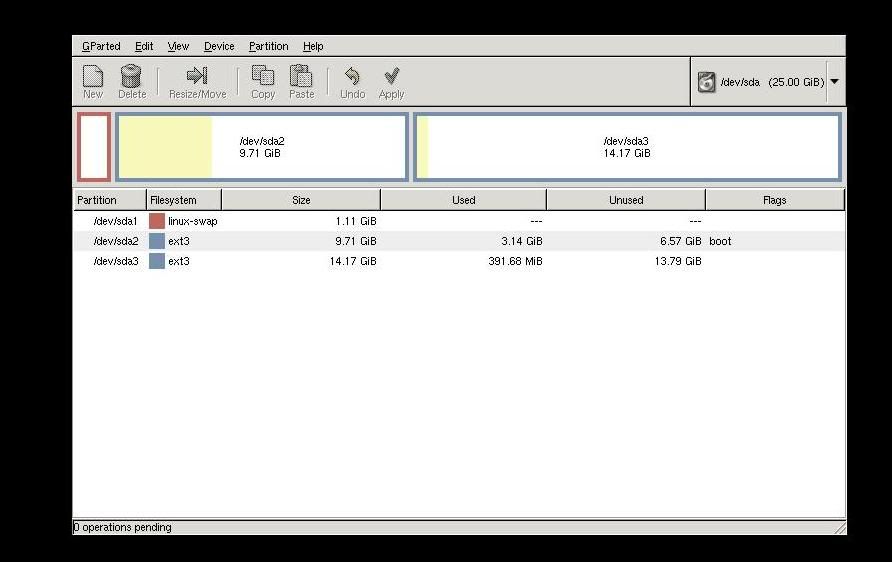
    6. After it it show you your hard disk partition


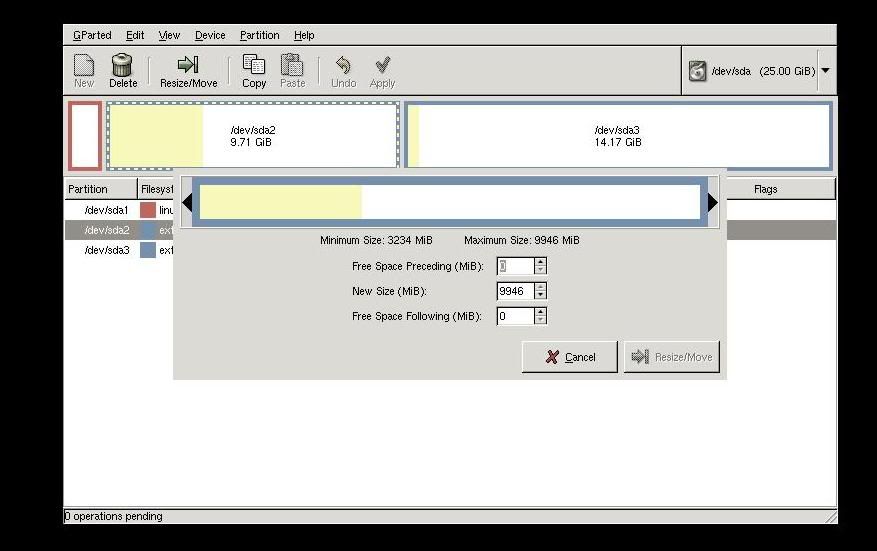
    7. Select your partition which you want to resize, right click on it and choose resize.
    8. Enter the space you require or can pulls it to decrise the size

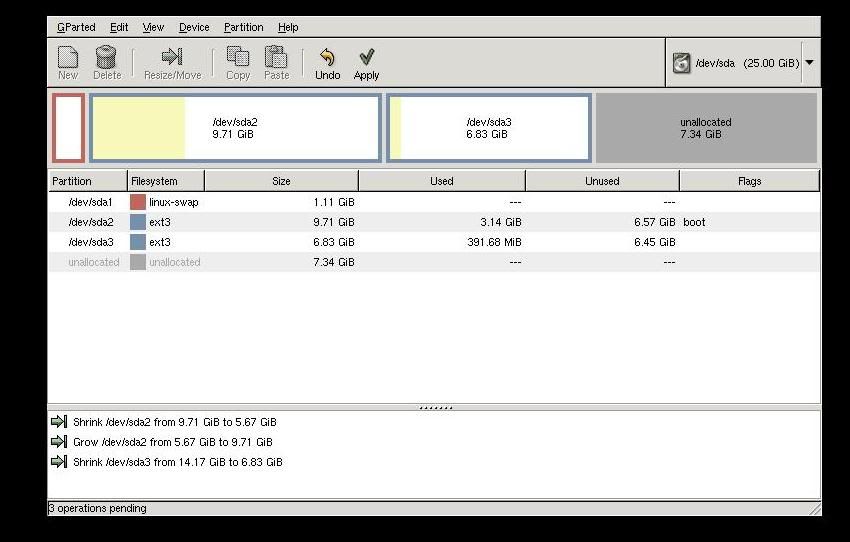
    9. click on apply


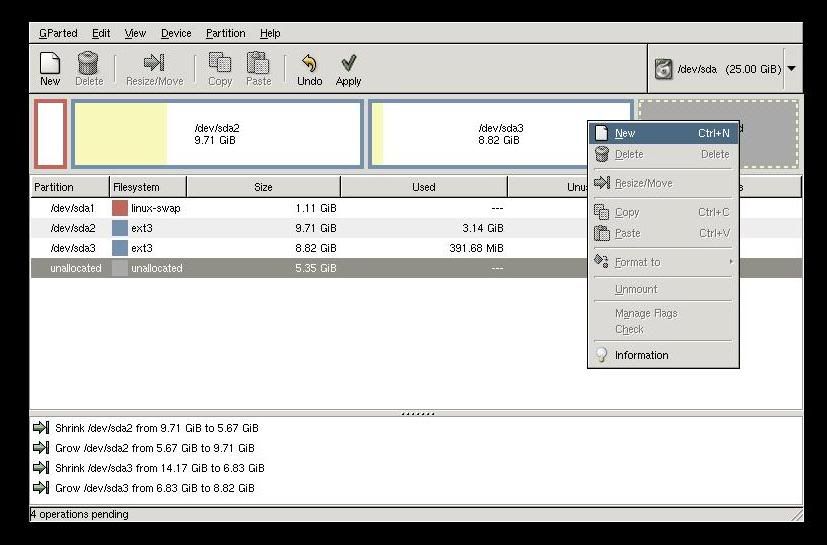
    10. Now some unlocated space is created, just select it to make new partion and right click on, click on NEW tab


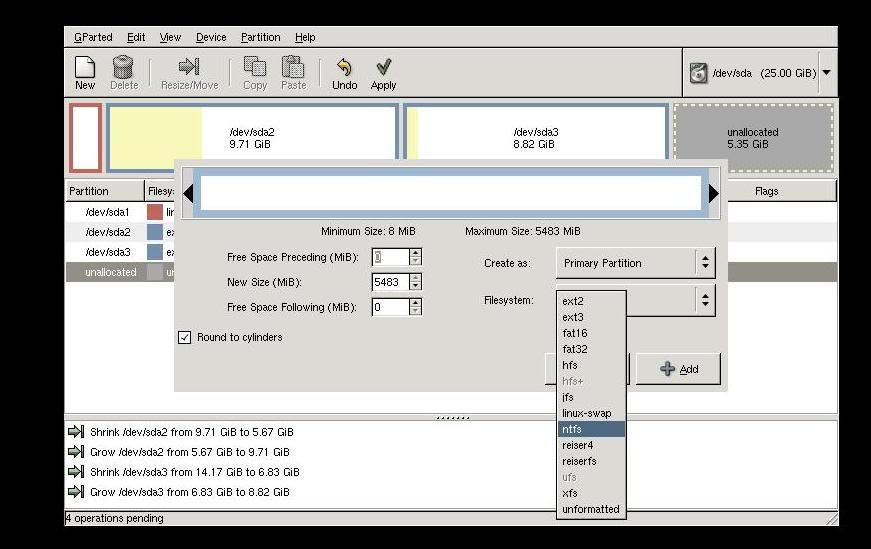
    11. Format it with any desire partition table NTFS, FAT, ext2, ext3.. etc


    12. Click apply it take some time to complete the process..


    13.Then shutdown it and use as usual your window new partion start showing on you mycomputer (in Windows) and new partition on desktop( in Linux).

    2009-01-30

    3G Technology >> NEW BOOMING


    Hi, friends as we know India is launching the 3G Technology.. May be from the next year we start talking with 3G phones on 3G style . But what is 3G, this question come in your mind when you start using the Technology, well 3G is third Generation Technology.. thru this you can watch online Movies without buffer, play high resolution game, download Movies with high speed Wireless Internet, you can chat with video, you can send big files in few minutes, you can say enjoy every thing through your 6- 7 inch Mobil phone.. Well it is not a dream. This will come to true in some month or you can say some days.
    Well after reading my above lines you are eager to know about this Technology, so after a long study I made a Word Document in which i mention some of keys, terms, and Explanation of this Technology

    Download 3G India
    Please Note it :- all the information i get on this Article thru Internet and many company sites.


    2008-10-10

    Sify Broadband Internet in Linux

    Sify is the one of popular broadband Internet company, it clam to be high speed Internet connectivity to the Clint, they are using different technique to provide Internet connectivity. To do so you have to download there connectivity Clint software which is free of cost but you have to do some settings in your windows PC for connectivity ( you have to add ip , subnet mask etc.). at windows level, it is very easy but you fails to do so at Linux, because at Linux nothing is install and run on one click.
    But if you think it is very hard then you also not correct, it is easy if you can do it step wise.
    Note:- I am telling you the procedure to install the sify Linux Clint on fedora Linux, you can done on other Linux too.
    To install the sify Internet Clint on the Linux see the steps
    1. First you have to add static ip address on your Ethernet card to make basic connectivity with the sify server to do that click at System , Administration menu , Network or simply right "system-config-network" at the terminal window it will display the screen like this
    2. After that double click on eth0 and you got this type of screen
    3. Make some changes on it like first click on statically "set ip addresses" and enter the ip address which is given by the sify at the time of connection installation.
    4. please check the option "Activate device when computer start" so that it will update it after rebooting (remember Linux show effects after rebooting).
    5. after all these settings, reboot the system. After rebooting click on "Mozilla Firefox Browser" and write the site which is given by your sify isp to download the Clint software. for example " http://203.144.134.10:8080/
    6. it will display a page of sify ftp on which you can download the Clint.
    7. Know click on the "GNU/Linux users click here to download the Sify Broadband client"
    8. it will display u other window on which you see two thing some ssl certification and a sifyclint.rpm(something like package) download it and copy/cut them and past it in any folder like in root, in home any folder.
    9. now open the terminal window in graphical login in Linux, go to that folder for example
    10. # cd \root
    11. now check that all the packages are on that folder or not by "dir" command or "ls -al" command. when you sure that all the packages are present on that folder write the command
    12. #rpm -ivh *.rpm
    13. remember one thing download the rpm packages because it easily install. it start installing after completing installation. write command
    14. #sifyconnect
    15. it will display a small dialogue box, asking username password,
    16. just type your password, username and enjoy the Internet

    2008-09-20

    Play And Get Codes Of Games At MY Site

    GAMES
    Enjoy the games here, play and make higher score.
    Sky Patrol

     Sonic Adventures

    Get these game codes by sending the comment don't forget to send you mail id and enjoy the games


    Play Commando 2


    2008-09-17

    Add/ Remove Software Problem In Fedora or Redhat Linux

    Friends, I wanted to share something with you. I have fedora 9 in my home system. I select its complete packages during Installation. But after installation I am unable to find the DHCP server package in it. I tries to install it from my Fedora Linux DVD. but I get some repomd.xml file is missing.
    Repomd.xml file is nothing it is a repository file which is store in "/etc/yum.repos.d" directory, you are thinking what is its work, actually this directory is the collocations of some repository files
    like fedora.rep, fedora-update.repo, livna.repo etc, these file is useful when you try to update or install software through Internet, every repo file have a specific function, if you open them then you see their is some Internet( ftp ) link. whenever you try the software through the command
    #yum install { for example #yum install dhcp}
    it connect through the Internet and start installing the package. Yum command help to install compile , remove and give its dependencies file needed for the packages and make it ready to use.
    But if you are trying to use through the Linux DVD then it fails and give the error that repomd.xml file is not found
    Nothing to worry friends now i find its solution and it is very easy , just follow some simple steps
    • first go to the /etc/yum.repo.d directory and open it by double click on the directory (remember i am telling you the graphical method of doing this, you can also use it through command line)
    • then make a repo file and name it cdrom.repo
    • copy the following content to that file (without the line space)
    [CDROM]
    name=cdrom
    baseurl=file:///media/dvd-rom/
    enabled=1
    gpgkey=file:///etc/pki/rpm-gpg/RPM-GPG-KEY-fedora
    gpgcheck=0
    • line after line and save it . after that open your terminal window and write the commands
    • [root@fedora ~]# mkdir /media/dvd-rom
      [root@fedora ~]#
      [root@fedora ~]# mount /dev/cdrom /media/dvd-rom/
    • remember insert Linux Installation DVD on the DVD rom before these commands
    • after that disable all other repository files (repo files ) only make enable cdrom.repo (Write #yum --disablerepo=> or just click on the repo and at the "enable=1" change it to "0" )
    • and save file then close it
    • Now click at "ADD/ REMOVE SOFTWARE" and click on any software package, try it to remove and install
    • Some time it not directly remove or install from add remove that time you just check which package you want to remove or install
    • then click on the DVD and click on packages and find the name of the package after that copy it and past it in any directory
    • open terminal window
    • and write command "#cd at which package is store for example ( cd /etc/home )
    • #rpm -ivh *.rpm
    • it automatically start installing . You can also do this to reach the DVD/package/ and write command " #rpm -ivh " and enjoy the packages. To install the software through Internet you have to disable the cdrom repo and enable all other repos like livina, fedora , fedora update etc (only change enable=0 to enable=1 )
    For More details click at http://fedoraproject.org/ or http://fedoraforum.org/